

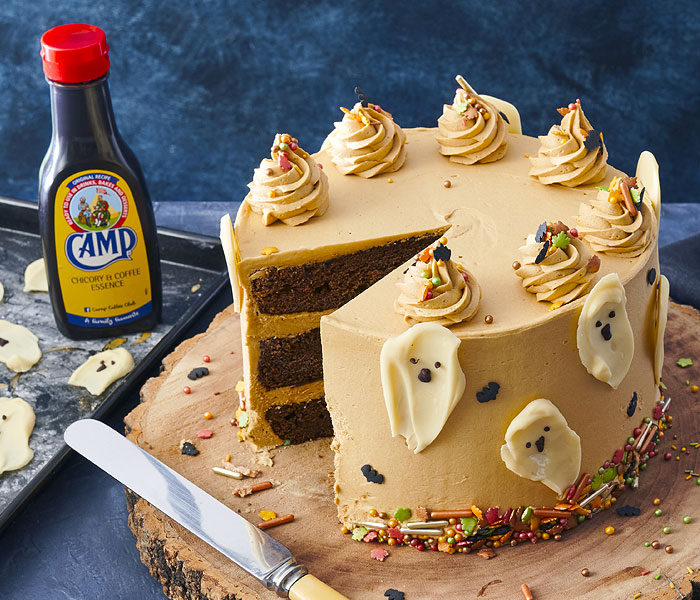
Halloween Showstopper: Camp Coffee Ghost ‘brushstrokes’ Cake
![]() Serves:
1 large cake approx. 20 slices
Serves:
1 large cake approx. 20 slices
![]() Level:
hard
Level:
hard
![]() Prep Time:
1hr 30 mins
Prep Time:
1hr 30 mins
Cook Time:
25 mins

Ingredients...
Ghosts
- 100g white choc
- 20g coconut oil or veg oil for melting
- Tiny bit of dark choc, melted or you can use black icing
- Halloween sprinkles of your choice
Frosting
- 600g unsalted butter, softened at room temp
- 1200g sifted icing sugar
- 2 tbsp Camp Coffee
Sticky Toffee Sauce
- 150 ml double cream
- 2 tsp Camp Coffee
- 100g dark brown sugar
- 100g unsalted butter
Sponges
- 325g pitted dates
- 350ml boiling water
- 2 tsp bicarbonate of soda
- 150g softened unsalted butter
- 300g light muscovado sugar
- 4 medium eggs
- 350g self-raising flour
- 1 tsp baking powder
- 2 ½ tbsp Camp coffee
- ½ tsp salt
You’ll need
- 3 x 20cm round cake tins, greased, base and side lined
- Stand mixer with paddle attachment, electric hand whisk or bowl and wooden spoon
- Medium and small crank handle palette knives
- Cake scraper (optional)
- Cake turntable (optional)
- Cake plate or stand
- Saucepan
- Baking sheet with parchment for ghosts
- Teaspoon
- Piping bag with hole snipped
- Piping bag with a large open star nozzle
Method...
- 1. You can make the ghosts in advance.
- 2. Melt the white chocolate with the oil gently, then spoon blobs of chocolate onto parchment lined trays and use a teaspoon to drag in one direction to create the ghost bodies, set aside to set.
- 3. Add the faces using melted dark chocolate or icing by piping with a small piping bag with a tiny hole snipped in the end, leave to set for a few hours or overnight.
- 4. Preheat the oven to 170c fan. Soak the dates in the recently boiled water with 2 tsp bicarbonate of soda, leave to soften while you cream the butter and sugar until very soft, pale and fluffy.
- 5. Add in the eggs, one at a time, mixing to combine in between each addition.
- 6. Whisk flour, salt, baking powder and mix into wet mix.
- 7. Process dates and add to the mix with 40g Camp Coffee, mix through then divide in between 3 tins.
- 8. Bake for approx. 20-25 mins until cooked through and skewer comes out clean.
- 9. Leave to cool in tins for 5 mins then turn out to cool completely.
- 10. Meanwhile, make the sauce.
- 11. Heat up the ingredients except the Camp Coffee, stirring until the sugar has dissolved, then gently simmer the sauce for a couple of minutes.
- 12. Remove from the heat, stir through the Camp Coffee and leave to cool, stirring occasionally.
- 13. Make the frosting by beating ¼ of the sugar into the butter until pale and fluffy, then add in the sugar in two further increments, beating well with each addition to make fluffy. Beat in half of the cooled sticky toffee sauce and the Camp Coffee.
- 14. To assemble the cake, if your sponges have any humps, trim to level and neaten first. Place the bottom layer onto your cake drum stand or plate (fix with a little smidge of buttercream to secure) and spread over a layer of frosting, then a drizzle of half the remaining toffee sauce, spread around to level. Top with a second layer of sponge and repeat with a layer of frosting and sauce.
- 15. Place the last layer on top with the smooth side that was in the bottom of the tin uppermost, and generously spread some of the frosting all around the sides of the cake first (this allows you to be able to hold the top of the cake still while you work around the cake). Use a gentle pressure against the side of the cake with the palette knife and use a back and forth spreading motion to spread the coating over the sides.
- 16. Once the side is covered, spread a nice even layer over the top of the cake.
- 17. Once the whole cake is covered, clean the palette knife and go around the cake again to smooth off the excess covering, spreading it until you are happy that it’s nice and neat. This is a crumb coat, which is a good base to work on to give a neat finish. Pop this into the fridge to chill and firm up for at least 30 mins to an hour.
- 18. For your final layer, cover over again with a thicker, neat layer of frosting over the top and sides of the cake, keeping about 150g back for the piped decoration. Paddle around the side and over the top until you are happy with the covering, use a cake side scraper to get it very neat if you have one.
- 19. Press some of the Halloween sprinkles around the base with the palm of your hand, it’s handy to do this on a turntable or on a cake stand with a tray underneath to catch any falling sprinkles. Add sprinkles onto the sides of the cake if you wish, I’ve used some little bats from my sprinkles mix, then, press the chocolate ghosts around the sides of the cake.
- 20. Add the top decoration by piping swirls onto the top of the cake around the edge, adding a few more sprinkles to each swirl.
- 21. The cake will keep for up to 3 days or can be frozen for up to 3 months.